> ## Documentation Index
> Fetch the complete documentation index at: https://docs.plaud.ai/llms.txt
> Use this file to discover all available pages before exploring further.
# Starter App Guide
> Build a branded app that connects to Plaud devices in minutes using the starter app.
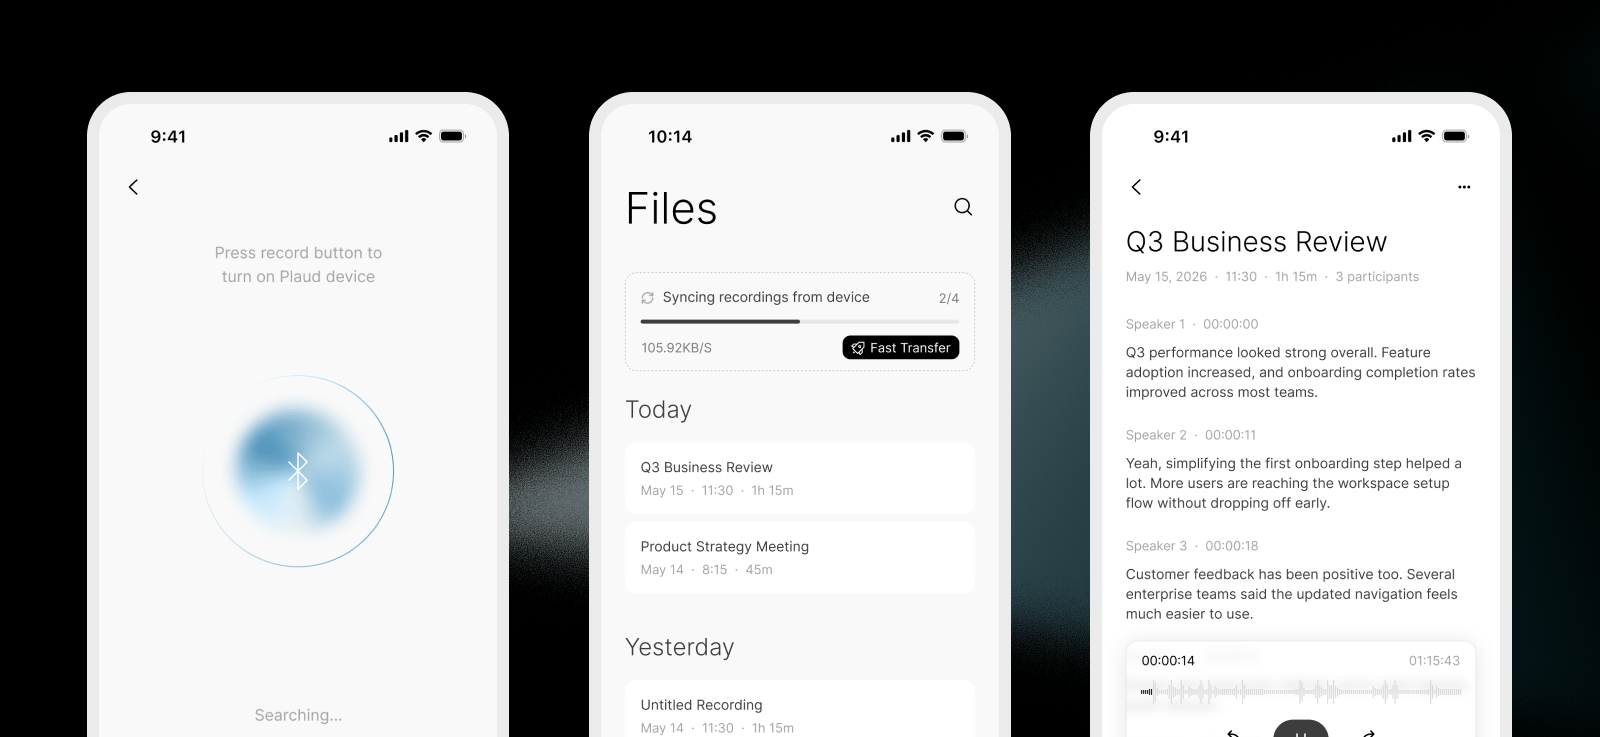
This guide walks through the process of building an iOS [Starter App](/plaud-embedded/starter-app-specs) that:
1. Connects to Plaud devices
2. Syncs recordings from Plaud device to mobile phone
3. Uploads recordings from your users' mobile phone to Plaud's file storage
4. Transcribes recordings with the [Transcription API](/plaud-embedded/transcription-api-overview)
 ## Video Tutorial
## Onboard to the Plaud Developer Platform
If you don't have access to the **Plaud Developer Platform**, visit **[dev.plaud.ai](https://dev.plaud.ai)** and fill out the contact form. Once your request is reviewed, you'll receive setup instructions and access to the developer console.
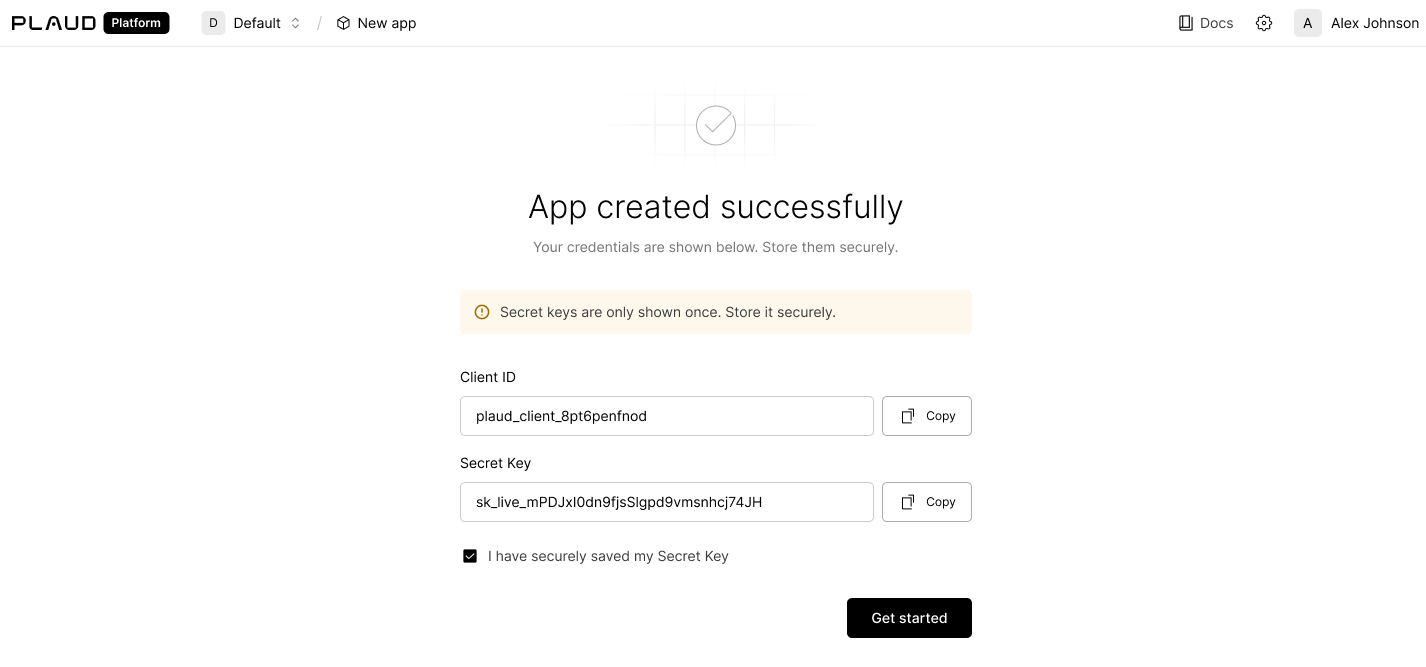
Create an **Embedded SDK Application** to receive your **Client ID** and **Secret Key**.
## Video Tutorial
## Onboard to the Plaud Developer Platform
If you don't have access to the **Plaud Developer Platform**, visit **[dev.plaud.ai](https://dev.plaud.ai)** and fill out the contact form. Once your request is reviewed, you'll receive setup instructions and access to the developer console.
Create an **Embedded SDK Application** to receive your **Client ID** and **Secret Key**.
 ## Set Up the Starter App
**Try the Plaud Embedded Skill** to have your coding agent help you through your Starter App deployment.
```bash theme={"system"}
npx skills add Plaud-AI/plaud-embedded-skills
```
Visit our [GitHub repo](https://github.com/Plaud-AI/plaud-embedded-skills.git) for more details on the skill.
### Prerequisites
* A Mac running macOS with **Xcode 16.0+** (the SDK is built with Swift 6.0.3)
* **iOS 14.0+** as deployment target
* An Apple ID for code signing onto a physical device. A free Apple ID works for local testing; TestFlight or App Store release (Step 6) requires the paid **Apple Developer Program**
* A **physical iOS device** — the SDK frameworks are `arm64`-only, so iOS Simulator is not supported
* A Plaud device for end-to-end testing
### Clone the starter app and generate the Xcode project
```bash theme={"system"}
git clone https://github.com/plaud-ai/plaud-sdk-public.git
cd plaud-template-app/plaud-template-app/ios
xcodegen generate
```
Install [XcodeGen](https://github.com/yonaskolb/XcodeGen) (brew install xcodegen) to generate an Xcode project from the `project.yml` file
The `xcodegen generate` step is required — `PlaudTemplateApp.xcodeproj` does not exist in source control and is built from `project.yml`.
You can find the GitHub repository for the [starter app here](https://github.com/plaud-ai/plaud-template-app).
### Retrieve a user token
The `USER_ACCESS_TOKEN` is the per-user JWT your backend mints by calling `POST /open/partner/users/access-token` on `platform-.plaud.ai`. See the [Authorization API reference](/plaud-embedded/auth-api-overview) for the full exchange flow. The Secret Key stays on your backend — never ship it with the app.
`client_id`, `secret_key`, and `api_key` are issued per region (currently `us` and `jp`; `eu` and `sg` coming soon). Your backend must call the matching `platform-.plaud.ai` host when minting the per-user access token — credentials issued for one region will not authenticate against another.
### Configure credentials
Open `PartnerConfig.xcconfig` and set three values:
```bash xcconfig theme={"system"}
# Required for SDK initialization
USER_ACCESS_TOKEN = your-user-access-token
# Required for the Transcription API
PLAUD_CLIENT_ID = your-client-id
PLAUD_API_KEY = your-api-key
```
**For local development**, create `PartnerConfig.local.xcconfig` alongside it with your real values — it's gitignored and overrides the placeholders.
Then open `project.yml` and change `bundleIdPrefix: com.plaud` to your own reverse-DNS prefix (e.g., `com.acme`); Xcode auto-assigns your Development Team on first build.
### (Optional) Apply branding
Four places control the entire visual identity:
#### App Name
There are two changes to make to change your app name:
1. In `project.yml`, add `CFBundleDisplayName` to properties
```yaml project.yml changes theme={"system"}
#...
info:
path: PlaudTemplateApp/Info.plist
properties:
CFBundleDisplayName: YourAppName # [!code ++]
UILaunchScreen:
UIColorName: "systemBackground"
UserAccessToken: $(USER_ACCESS_TOKEN)
```
Re-run `xcodegen generate` after editing
2. Verify that `Info.plist` includes `CFBundleDisplayName`
```html Info.plist changes theme={"system"}
CFBundleDevelopmentRegion
$(DEVELOPMENT_LANGUAGE)
CFBundleDisplayName
YourAppName
CFBundleExecutable
$(EXECUTABLE_NAME)
```
#### App icon
Add your PNG icon to `PlaudTemplateApp/Resources/Assets.xcassets/AppIcon.appiconset/`. Then in the `.../Assets.xcassets/AppIcon.appiconset/Contents.json` file add your icon filename.
```yaml Contents.json theme={"system"}
{
"images" : [
{
"filename" : "your-icon-1024x1024.png", # [!code ++]
"idiom" : "universal",
"platform" : "ios",
"size" : "1024x1024"
```
Your icon image must be a `.png` file without a transparent background or alpha.
#### Theme colors
In `PlaudTemplateApp/Common/PlaudTheme.swift`, edit the `UIColor(hex:)` constants. The template ships intentionally monochrome (`#1f1f1f` labels, `#f9f9f9` background)
```swift PlaudTheme.swift changes theme={"system"}
static let backgroundPrimary = UIColor(hex: "#f9f9f9") // [!code --]
static let labelPrimary = UIColor(hex: "#1f1f1f") // [!code --]
static let backgroundPrimary = UIColor(hex: "#E4DDC8") // [!code ++]
static let labelPrimary = UIColor(hex: "#1e293b") // [!code ++]
```
#### Welcome Screen
In `PlaudTemplateApp/UI/Onboarding/WelcomeViewController.swift`, replace `App Name` and the `UIImage(systemName: "square.grid.2x2")` with your app name and icon.
```swift WelcomeViewController.swift changes theme={"system"}
private let logoIcon: UIImageView = {
let iv = UIImageView(image: UIImage(systemName: "square.grid.2x2")) // [!code --]
iv.tintColor = .label//[!code --]
let iv = UIImageView(image: UIImage(named: "your-icon"))// [!code ++]
iv.contentMode = .scaleAspectFit
iv.translatesAutoresizingMaskIntoConstraints = false
return iv
}()
/// App name label (B2B customers replace with their own brand name)
private let appNameLabel: UILabel = {
let l = UILabel()
l.text = "App name"//[!code --]
l.text = "Your App Name!"//[!code ++]
l.font = PlaudTheme.largeTitle()
```
You'll need to create an imageset for your icon asset
## Run & test with a real device
```bash theme={"system"}
open PlaudTemplateApp.xcodeproj # then ⌘R in Xcode
```
Connect a physical iPhone over USB and select it as the run destination. Simulator is not supported — the SDK frameworks are `arm64`-only.
Verify app launches, device pairs, recording syncs, and transcript appears on your iPhone.
**Unbind your Plaud device after testing and before uninstalling the Starter App!**
Plaud devices can only be bound to one application at a time (tied to your Partner Token). You will not be able to bind your Plaud device to another app (or the Plaud App) before unbinding from the Starter App.
Device binding is also affected by the unique app installation. If you are uninstalling the Starter App from your phone, **be sure to unbind your Plaud device before uninstalling.**
## Publishing to Testflight and the App Store
You will need an [Apple Developer Account](https://developer.apple.com/account) to sign your app and publish to the app store (current pricing is \$99/year)
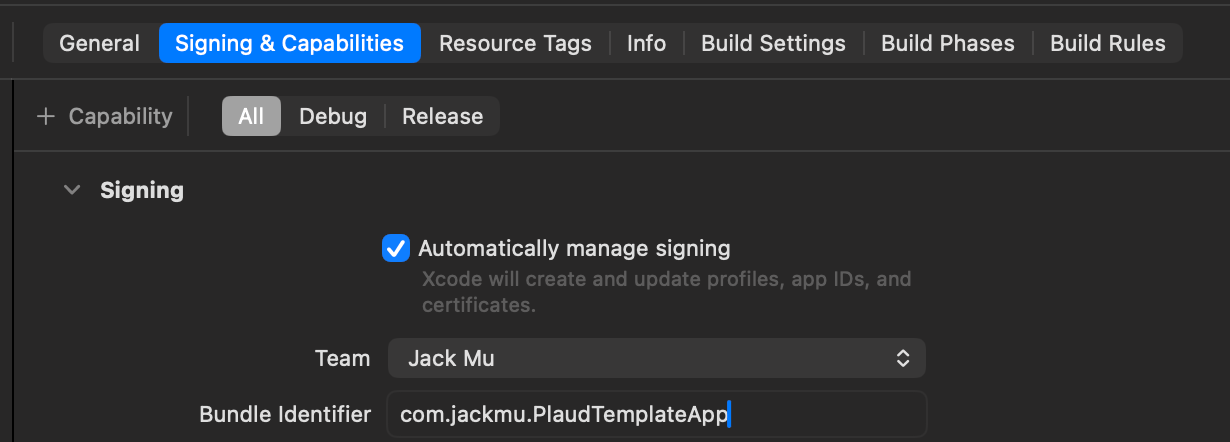
In the `Signing and Capabilities` tab, click on `Automatically Manage Signing`, set your developer team account, and input a **unique** bundle ID
## Set Up the Starter App
**Try the Plaud Embedded Skill** to have your coding agent help you through your Starter App deployment.
```bash theme={"system"}
npx skills add Plaud-AI/plaud-embedded-skills
```
Visit our [GitHub repo](https://github.com/Plaud-AI/plaud-embedded-skills.git) for more details on the skill.
### Prerequisites
* A Mac running macOS with **Xcode 16.0+** (the SDK is built with Swift 6.0.3)
* **iOS 14.0+** as deployment target
* An Apple ID for code signing onto a physical device. A free Apple ID works for local testing; TestFlight or App Store release (Step 6) requires the paid **Apple Developer Program**
* A **physical iOS device** — the SDK frameworks are `arm64`-only, so iOS Simulator is not supported
* A Plaud device for end-to-end testing
### Clone the starter app and generate the Xcode project
```bash theme={"system"}
git clone https://github.com/plaud-ai/plaud-sdk-public.git
cd plaud-template-app/plaud-template-app/ios
xcodegen generate
```
Install [XcodeGen](https://github.com/yonaskolb/XcodeGen) (brew install xcodegen) to generate an Xcode project from the `project.yml` file
The `xcodegen generate` step is required — `PlaudTemplateApp.xcodeproj` does not exist in source control and is built from `project.yml`.
You can find the GitHub repository for the [starter app here](https://github.com/plaud-ai/plaud-template-app).
### Retrieve a user token
The `USER_ACCESS_TOKEN` is the per-user JWT your backend mints by calling `POST /open/partner/users/access-token` on `platform-.plaud.ai`. See the [Authorization API reference](/plaud-embedded/auth-api-overview) for the full exchange flow. The Secret Key stays on your backend — never ship it with the app.
`client_id`, `secret_key`, and `api_key` are issued per region (currently `us` and `jp`; `eu` and `sg` coming soon). Your backend must call the matching `platform-.plaud.ai` host when minting the per-user access token — credentials issued for one region will not authenticate against another.
### Configure credentials
Open `PartnerConfig.xcconfig` and set three values:
```bash xcconfig theme={"system"}
# Required for SDK initialization
USER_ACCESS_TOKEN = your-user-access-token
# Required for the Transcription API
PLAUD_CLIENT_ID = your-client-id
PLAUD_API_KEY = your-api-key
```
**For local development**, create `PartnerConfig.local.xcconfig` alongside it with your real values — it's gitignored and overrides the placeholders.
Then open `project.yml` and change `bundleIdPrefix: com.plaud` to your own reverse-DNS prefix (e.g., `com.acme`); Xcode auto-assigns your Development Team on first build.
### (Optional) Apply branding
Four places control the entire visual identity:
#### App Name
There are two changes to make to change your app name:
1. In `project.yml`, add `CFBundleDisplayName` to properties
```yaml project.yml changes theme={"system"}
#...
info:
path: PlaudTemplateApp/Info.plist
properties:
CFBundleDisplayName: YourAppName # [!code ++]
UILaunchScreen:
UIColorName: "systemBackground"
UserAccessToken: $(USER_ACCESS_TOKEN)
```
Re-run `xcodegen generate` after editing
2. Verify that `Info.plist` includes `CFBundleDisplayName`
```html Info.plist changes theme={"system"}
CFBundleDevelopmentRegion
$(DEVELOPMENT_LANGUAGE)
CFBundleDisplayName
YourAppName
CFBundleExecutable
$(EXECUTABLE_NAME)
```
#### App icon
Add your PNG icon to `PlaudTemplateApp/Resources/Assets.xcassets/AppIcon.appiconset/`. Then in the `.../Assets.xcassets/AppIcon.appiconset/Contents.json` file add your icon filename.
```yaml Contents.json theme={"system"}
{
"images" : [
{
"filename" : "your-icon-1024x1024.png", # [!code ++]
"idiom" : "universal",
"platform" : "ios",
"size" : "1024x1024"
```
Your icon image must be a `.png` file without a transparent background or alpha.
#### Theme colors
In `PlaudTemplateApp/Common/PlaudTheme.swift`, edit the `UIColor(hex:)` constants. The template ships intentionally monochrome (`#1f1f1f` labels, `#f9f9f9` background)
```swift PlaudTheme.swift changes theme={"system"}
static let backgroundPrimary = UIColor(hex: "#f9f9f9") // [!code --]
static let labelPrimary = UIColor(hex: "#1f1f1f") // [!code --]
static let backgroundPrimary = UIColor(hex: "#E4DDC8") // [!code ++]
static let labelPrimary = UIColor(hex: "#1e293b") // [!code ++]
```
#### Welcome Screen
In `PlaudTemplateApp/UI/Onboarding/WelcomeViewController.swift`, replace `App Name` and the `UIImage(systemName: "square.grid.2x2")` with your app name and icon.
```swift WelcomeViewController.swift changes theme={"system"}
private let logoIcon: UIImageView = {
let iv = UIImageView(image: UIImage(systemName: "square.grid.2x2")) // [!code --]
iv.tintColor = .label//[!code --]
let iv = UIImageView(image: UIImage(named: "your-icon"))// [!code ++]
iv.contentMode = .scaleAspectFit
iv.translatesAutoresizingMaskIntoConstraints = false
return iv
}()
/// App name label (B2B customers replace with their own brand name)
private let appNameLabel: UILabel = {
let l = UILabel()
l.text = "App name"//[!code --]
l.text = "Your App Name!"//[!code ++]
l.font = PlaudTheme.largeTitle()
```
You'll need to create an imageset for your icon asset
## Run & test with a real device
```bash theme={"system"}
open PlaudTemplateApp.xcodeproj # then ⌘R in Xcode
```
Connect a physical iPhone over USB and select it as the run destination. Simulator is not supported — the SDK frameworks are `arm64`-only.
Verify app launches, device pairs, recording syncs, and transcript appears on your iPhone.
**Unbind your Plaud device after testing and before uninstalling the Starter App!**
Plaud devices can only be bound to one application at a time (tied to your Partner Token). You will not be able to bind your Plaud device to another app (or the Plaud App) before unbinding from the Starter App.
Device binding is also affected by the unique app installation. If you are uninstalling the Starter App from your phone, **be sure to unbind your Plaud device before uninstalling.**
## Publishing to Testflight and the App Store
You will need an [Apple Developer Account](https://developer.apple.com/account) to sign your app and publish to the app store (current pricing is \$99/year)
In the `Signing and Capabilities` tab, click on `Automatically Manage Signing`, set your developer team account, and input a **unique** bundle ID
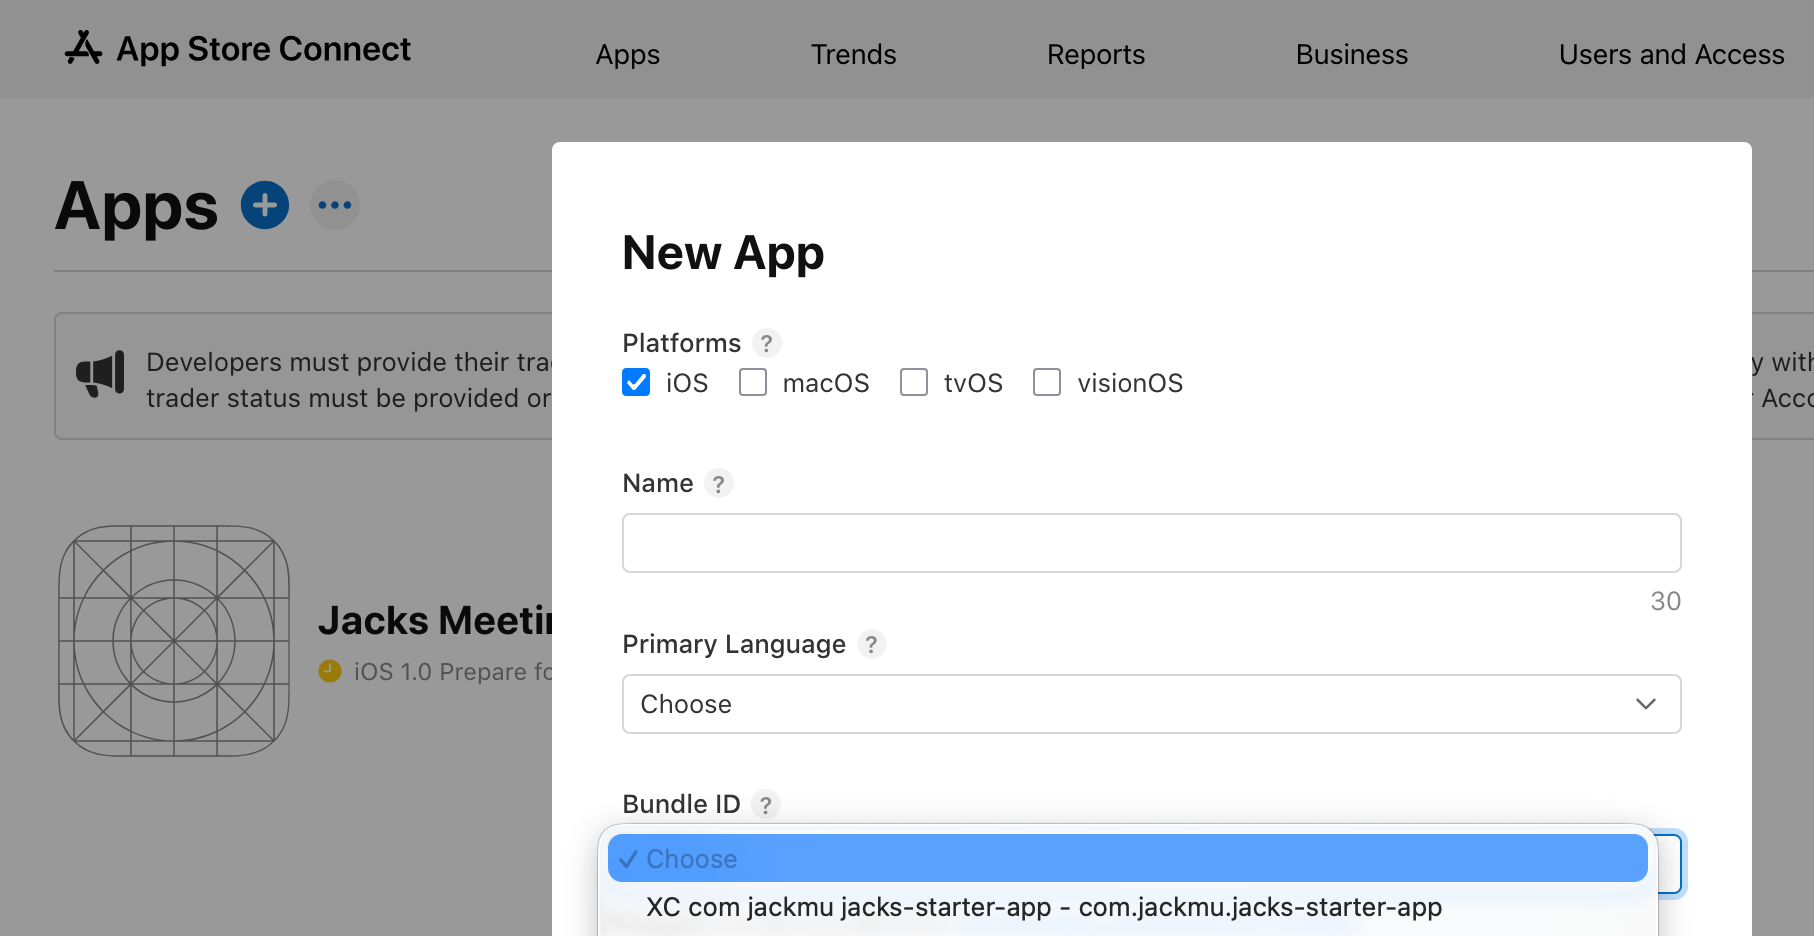
 In [Apple App Connect](https://appstoreconnect.apple.com/apps), create an iOS app and tag your bundle ID from Step 2
 In the XCode topbar, navigate to `Product > Archive`. After clicking `Distribute` you should see options to publish to App Connect and Testflight
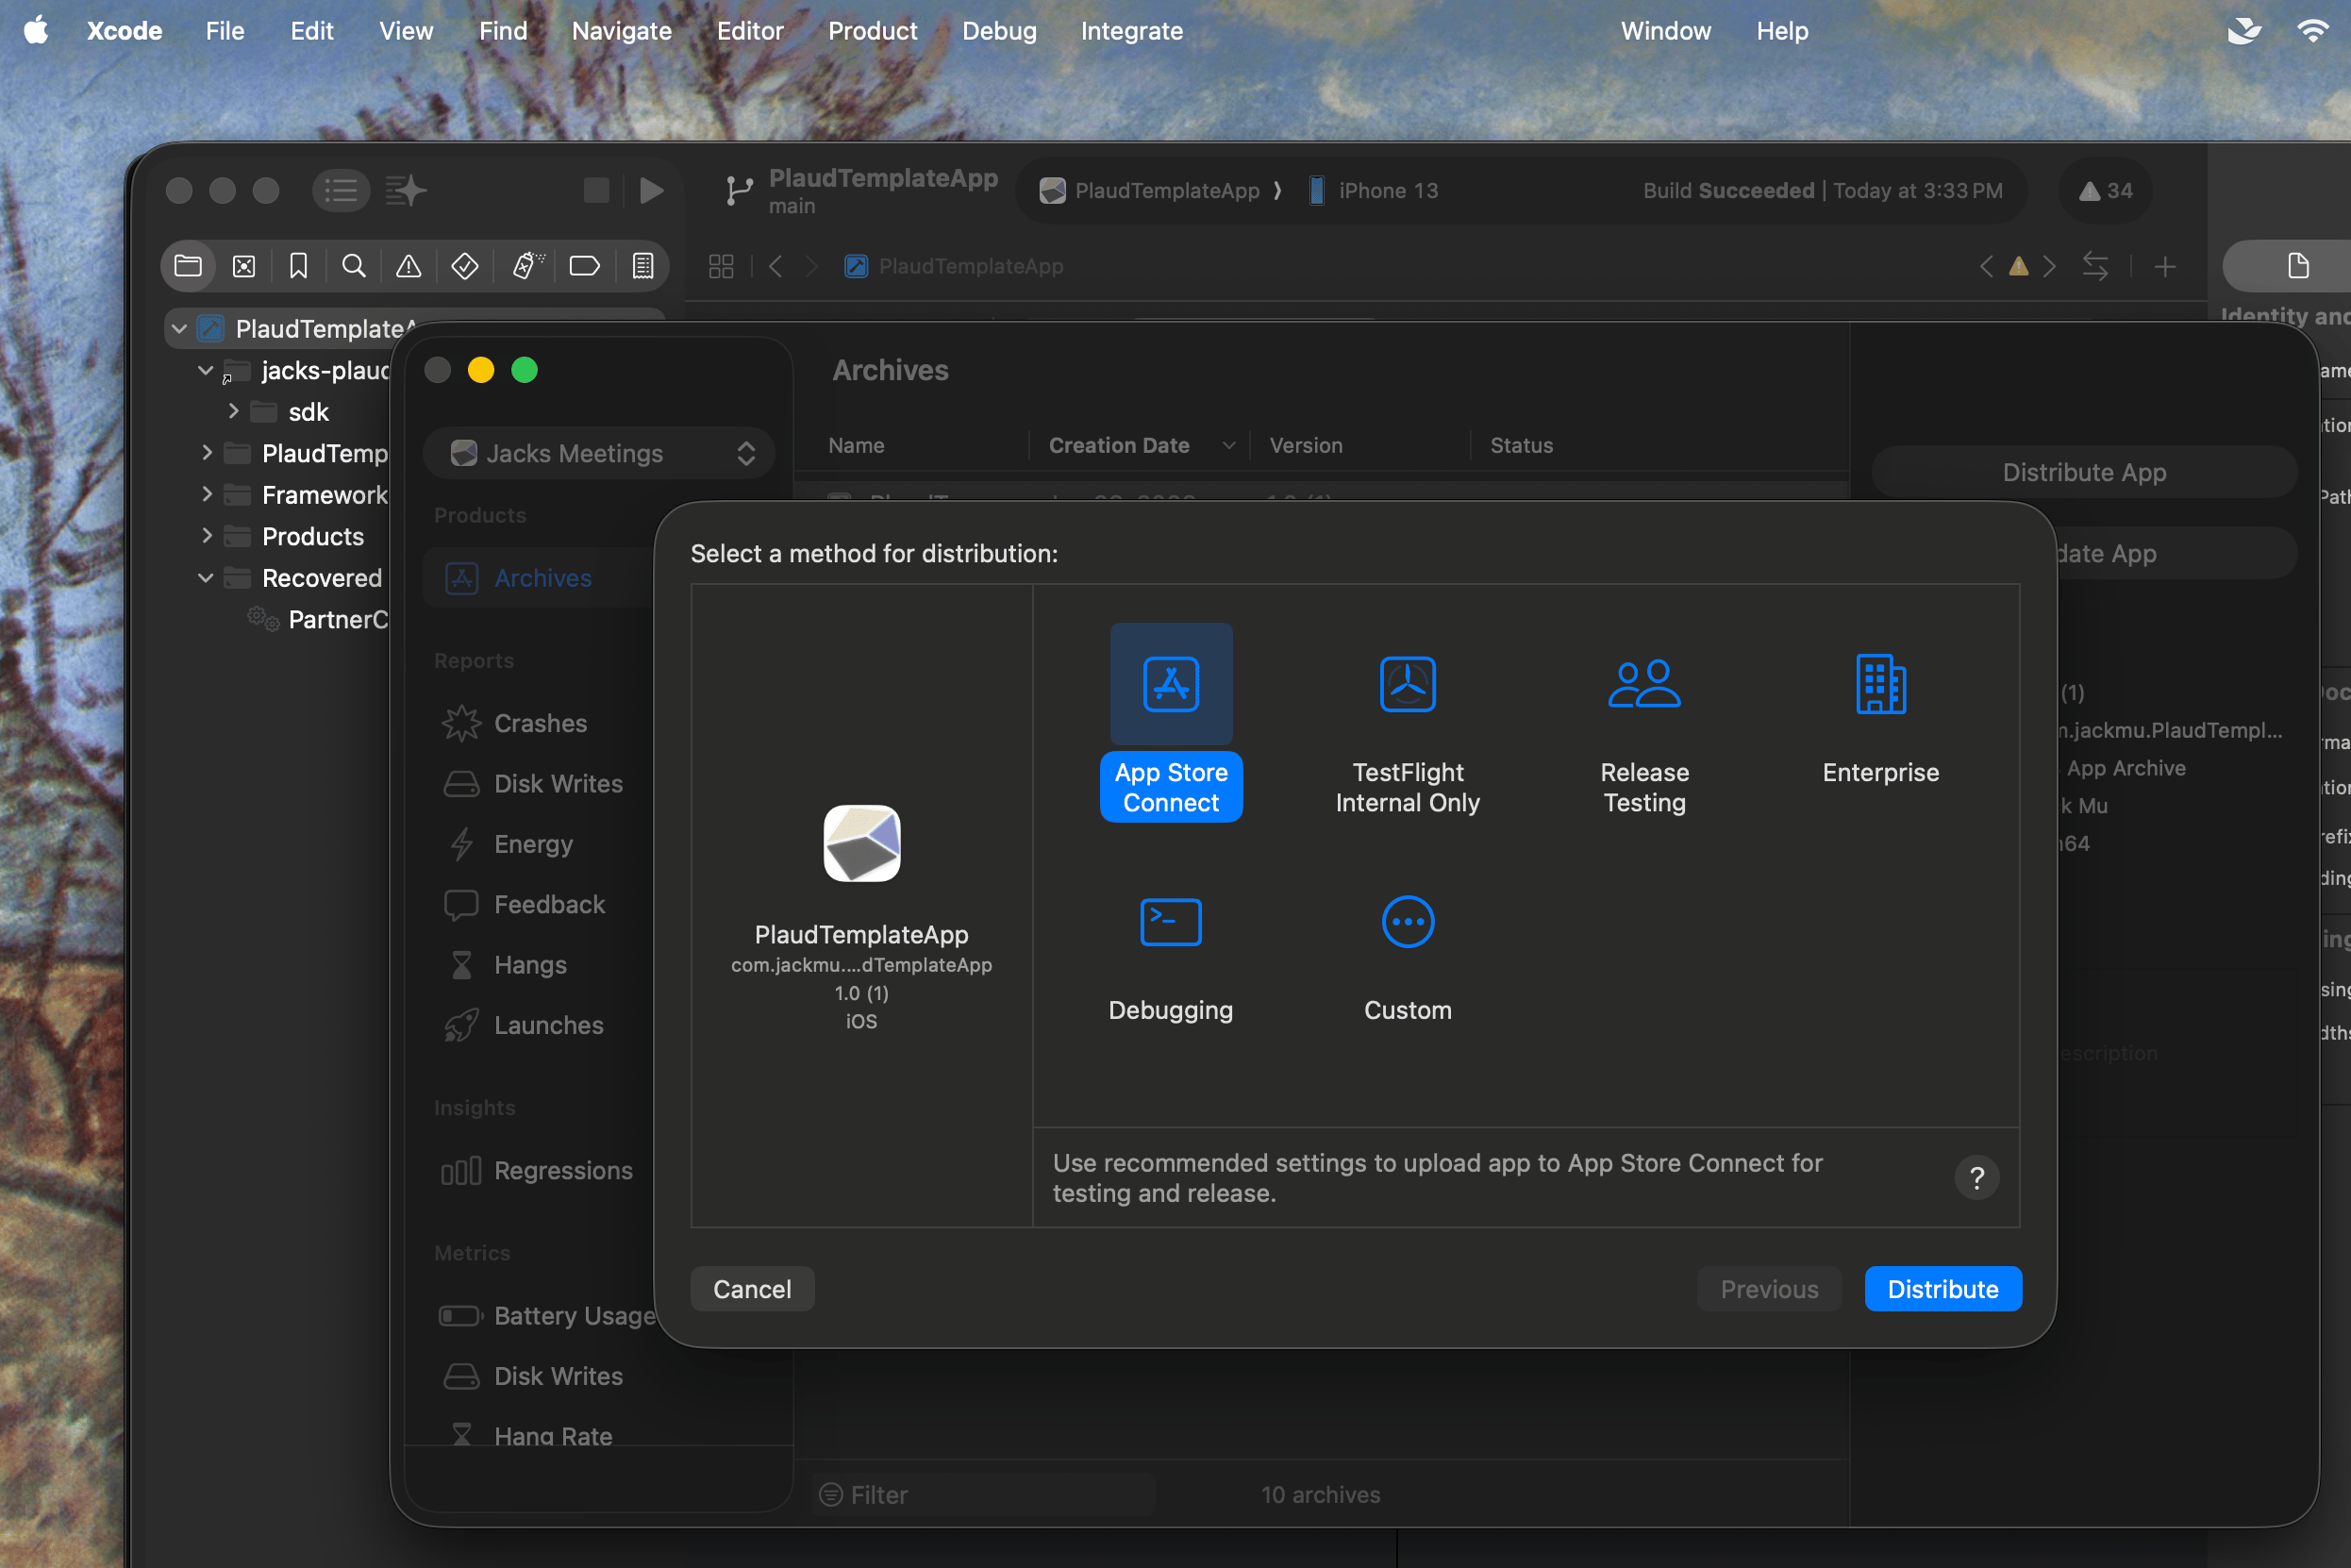 Navigating back to your [Apple App Connect Portal](https://appstoreconnect.apple.com/apps), you can now either:
1. Fill out the necessary information for App Connect
2. Choose your users for Testflight invites
Either distribution method, you should be able to select your archived bundle from Step 4.
For App Connect, the Apple approval process will take some time.
If you're using Testflight, your beta users should download the **Testflight** app in the App Store, accept their invite, and they can start using your app!
Navigating back to your [Apple App Connect Portal](https://appstoreconnect.apple.com/apps), you can now either:
1. Fill out the necessary information for App Connect
2. Choose your users for Testflight invites
Either distribution method, you should be able to select your archived bundle from Step 4.
For App Connect, the Apple approval process will take some time.
If you're using Testflight, your beta users should download the **Testflight** app in the App Store, accept their invite, and they can start using your app!